Teaching children to draw in perspective helps them understand space, depth, and proportion—skills that translate into both artistic confidence and academic thinking. For homeschoolers, especially, learning perspective can bring structure and long-term results to an art curriculum without requiring expensive materials or complicated tools. With the right guidance, even young children can begin to grasp the principles of one-point and two-point perspective, creating drawings that look realistic and well-proportioned. This guide is designed to help parents introduce perspective drawing through fun, age-appropriate steps that build skill, vision, and visual literacy.
While children often begin with imaginative, symbolic drawing, they benefit from learning how real objects exist in space. Teaching perspective doesn’t remove creativity—it organizes it. Just like learning grammar helps kids write better stories, learning perspective allows them to express their ideas with greater accuracy and intention. Whether your child dreams of becoming an illustrator, an architect, or just enjoys sketching, perspective is a foundational tool in their artistic toolbox.
Why Perspective Drawing Matters in Art Education
Building Visual Literacy and Spatial Thinking
Teaching children perspective drawing equips them with the ability to think three-dimensionally—essential in many disciplines. As kids learn how to represent objects receding into the distance, they develop spatial reasoning skills used in geometry, science, engineering, and even sports. Visual literacy, the ability to “read” and understand images, also grows stronger when kids learn to construct believable space.
Perspective also encourages analytical thinking. A child drawing a table not only has to consider how long it is, but how it looks from a certain angle. They begin to ask questions like “How does this object change if I move closer?” or “What happens to parallel lines when I draw them in a scene?” These are excellent habits of mind, developing both logic and observational awareness.
The Role of Perspective in Traditional Art
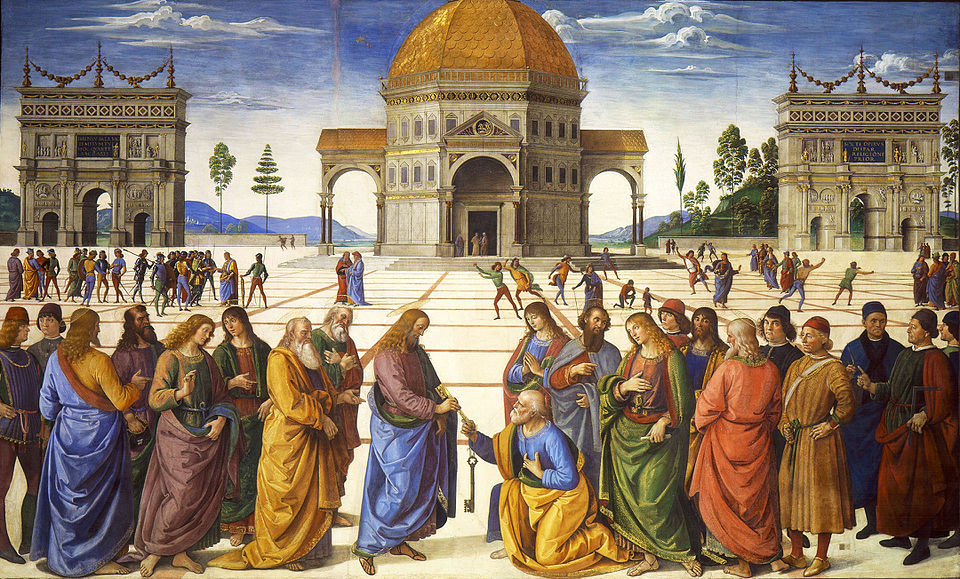
Linear perspective as a formal system was developed in early 15th-century Italy. In around AD 1415, Filippo Brunelleschi, a Florentine architect, demonstrated the use of one-point perspective by painting the Florence Baptistery from a fixed point and showing that all the lines converged toward a vanishing point. This was a revolutionary shift from the more symbolic and flat representations common in medieval art.
By the mid-15th century, artists like Leon Battista Alberti and Piero della Francesca were using Brunelleschi’s theories to give realism and structure to their paintings. Leonardo da Vinci’s The Last Supper (AD 1495–1498) is one of the most well-known examples of one-point perspective in Renaissance art, using strong orthogonals to direct the viewer’s gaze toward Christ. Albrecht Dürer, a German artist active in the early 1500s, created detailed perspective studies and woodcuts that influenced art across Europe. These examples give students historical anchors for understanding why perspective matters.
Famous Works That Use Perspective Kids Can Study
- The Last Supper – Leonardo da Vinci
- School of Athens – Raphael
- Interior of a Gothic Church – Pieter Jansz. Saenredam
- Annunciation – Fra Angelico
- Perspective View of a Bridge – Utagawa Hiroshige
These works can be explored through books, printable images, or online museum collections.
Perspective Drawing vs. Free Drawing
Free drawing—what many children start with—relies on imagination and internal visual memory. It’s essential for early creativity. But once children begin to want their drawings to “look real,” perspective offers a reliable way to get there. Without it, kids often get frustrated when their houses or roads don’t match what they see in real life.
Even cartoonists, graphic novelists, and animators rely on perspective. Walt Disney’s studios trained animators to draw scenes with vanishing points and scaled characters to preserve believability. Knowing the rules of space helps artists break them skillfully. For kids, perspective doesn’t limit creativity—it opens it up to new possibilities.
Core Concepts to Teach Before Drawing Starts
What Is a Horizon Line?
The horizon line is where the sky appears to meet the ground, usually at eye level. For kids, this can be introduced simply by going outside and pointing out where the road seems to end or where a fence meets the background. It doesn’t matter whether they live in the city or countryside—every setting has a horizon.
The horizon line in art represents the viewer’s eye level. If you crouch down low, the horizon lowers; if you stand on a hill, the horizon rises. Children can draw simple landscapes where they identify this line before adding any objects. Explaining this helps them place objects more accurately in space—whether near or far.
Understanding the Vanishing Point
The vanishing point is where parallel lines appear to meet on the horizon line. It’s how artists trick the eye into seeing depth. Roads, railways, hallways, and fences all give great examples. Even children’s books often show this when depicting long hallways or tunnels. Once they understand the idea of “things getting smaller as they go away,” they’re halfway there.
A fun exercise for kids is drawing two parallel lines (like a train track) and slowly narrowing them toward the vanishing point. They begin to see how size, placement, and line direction all play into a believable scene. Encourage them to look for vanishing points in real life—driving down a highway is a great example.
Foreground, Middleground, and Background
Breaking up a scene into three parts—foreground (closest), middleground (middle distance), and background (furthest)—helps kids organize space on paper. Many children tend to “stack” objects vertically, but this system encourages them to layer things in a more natural, spatial way. It also teaches scale and placement.
A fun classroom activity involves layering cut-outs on construction paper. A tree in the foreground is bigger and lower on the page, while mountains in the background are smaller and near the top. These activities help the child’s hand match what the eye sees and prepares them for more structured drawing later.
Step-by-Step Perspective Drawing Lessons for Kids
One-Point Perspective Basics
Start with one-point perspective. It’s perfect for children around ages 7 to 10. The child places a horizon line across the page and a vanishing point in the center. Then, they can draw a road, hallway, or row of trees that all shrink toward that point. Using a ruler is helpful here—it teaches precision and hand-eye coordination.
A typical first project might be a road with telephone poles that get smaller as they stretch into the distance. The same concept can be used for drawing the inside of a room, such as looking down a hallway or into a bedroom. Once kids see how easy it is to make things look “real,” they’ll want to keep going.
Two-Point Perspective for Advanced Beginners
Two-point perspective is more complex but appropriate for kids 9 and older who are ready for a challenge. Instead of one vanishing point, there are two—usually placed on the far left and right ends of the horizon. This system is perfect for drawing corners of buildings, streets, or boxes in 3D.
A common beginner project is to draw a cube or house using two vanishing points. The front corner faces the viewer, while the sides taper toward the points. This introduces students to the idea of angle and plane—what faces toward us versus away. At this stage, math and art begin to intersect, especially in the use of measurement and proportional reasoning.
Perspective Drawing Projects for Practice
Once the basics are in place, kids can begin practicing through a sequence of simple, progressive projects. The key is consistency—short lessons done a few times per week are more effective than long sessions crammed together. Parents can create a 4–6 week unit that includes a mixture of imaginative and real-world scenes.
Assign tasks like drawing a street with buildings, a classroom interior, or a fantasy landscape with castles and roads. Encourage them to use grid paper for early attempts—it helps avoid frustration by keeping lines straight and angles clean. Always ask them what they’re trying to show in the drawing; this helps them think intentionally about space.
6 Easy Project Ideas Using Perspective
- Road disappearing into the mountains
- A toy train track in 3D
- Draw your bedroom using one-point perspective
- An imaginary city block
- Outdoor picnic scene with a table in perspective
- School hallway with lockers
Tips for Homeschoolers Teaching Perspective Drawing
Keeping Lessons Short and Consistent
Children’s attention spans are short, and for art, it’s best to keep sessions focused and positive. Aim for 20–30 minutes per session, no more than three times a week. This allows enough time for explanation, drawing, and discussion without overwhelming the child. Repetition builds skill better than long, infrequent sessions.
Try to keep a consistent time each week, such as right after lunch or mid-morning, depending on your schedule. Art should be something the child looks forward to. Resist the urge to “fix” their drawings for them—let them experiment. If you need to demonstrate, do it on a separate sheet, not over their work.
Simple Materials and Tools to Use
You don’t need anything fancy to teach perspective. A solid homeschool art supply list includes:
- #2 pencils
- Rulers (12” or longer)
- Erasers
- Sketchbooks or printer paper
- Colored pencils or pens (optional)
- Grid paper (optional)
Some parents also create viewfinders (a small cardboard rectangle with a cut-out window) to help kids focus on sections of their visual field. Free online tools or printables can be found on museum education pages, like The Met or the National Gallery of Art.
When to Add Feedback or Correction
Feedback is important, but timing is everything. Focus on praising effort and noticing improvement. If a child struggles with the vanishing point, offer guidance but don’t take over the process. Ask questions like, “Where is the viewer standing in this picture?” or “Why does this side look longer than the other?”
Letting kids discover their mistakes builds visual problem-solving. That’s part of the goal. Remember, the purpose of homeschool art isn’t to churn out perfect drawings—it’s to build confidence, observation, and patience. The ability to see and translate space onto a page is a valuable gift that grows with time.
Key Takeaways
- Perspective drawing builds spatial thinking and visual literacy in children.
- One-point and two-point systems help organize drawings realistically.
- Classical artists like Brunelleschi and da Vinci pioneered linear perspective.
- Short, regular lessons (20–30 minutes) are ideal for homeschool schedules.
- Simple tools like rulers, grid paper, and photos are all you need to begin.
FAQs
What age should kids start learning perspective?
Kids can begin learning one-point perspective as early as age 7. Two-point can follow by age 9 or 10 with maturity and motor control.
Is perspective drawing too technical for young kids?
Not at all. When broken down into steps and supported with visuals, even young children can grasp the basics.
Do I need to buy special supplies or software?
No. You can teach perspective using basic school supplies—pencils, rulers, and paper. Free worksheets and demos are available online.
Can I connect perspective to other subjects?
Yes. Perspective links naturally to geometry, measurement, spatial reasoning, and even storytelling.
What if my child just wants to draw freely?
Let them! Use perspective lessons as structured time, but allow room for free expression. Structure and freedom can coexist.