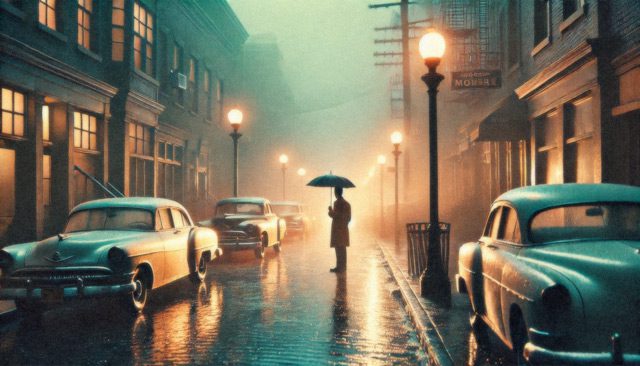
Cinematic photography has the power to tell a story, evoke a mood, and captivate the viewer in much the same way as a movie frame. But achieving this cinematic look in photography requires a blend of technical knowledge, a keen eye for composition, and a knack for storytelling. This guide breaks down the essential elements and techniques that can transform your photos into cinematic masterpieces.
1. Understanding the Cinematic Aesthetic
The cinematic aesthetic in photography is all about creating images that look like they could be frames from a movie. It’s not just about making a photo look dramatic; it’s about capturing emotion, mystery, and a sense of story.
- Mood: Cinematic photos often convey a specific mood, whether it’s suspense, romance, or nostalgia. Think about the mood you want to evoke before you shoot.
- Atmosphere: Elements like fog, rain, or dust can add atmosphere, making a photo feel more like a movie scene.
- Lighting: Cinematic lighting is often dramatic, using high contrast, shadows, and selective highlights to emphasize the subject.
This aesthetic also leans on storytelling elements like subject placement and environment. Imagine you’re setting up a shot to capture an emotion or a pivotal story moment.
2. Choosing the Right Equipment
While a high-quality camera is helpful, it’s not essential for cinematic photos. Here are some recommendations:
- Camera: A DSLR or mirrorless camera with manual settings offers greater control over exposure, depth, and focus, all essential for a cinematic look.
- Lens: Prime lenses with a wide aperture (like f/1.8 or lower) help create the shallow depth of field that makes subjects pop from the background.
- Filters: Using ND filters allows you to shoot with slower shutter speeds in daylight, giving your images a smoother, more polished look.
A good lens and manual control over settings matter more than the latest camera model. Even a smartphone can produce cinematic images with the right approach!
3. Mastering Lighting for Cinematic Effect
Lighting is a cornerstone of cinematic photography. Think of light as the paintbrush for creating emotion.
- Natural Light: Golden hour (just after sunrise and before sunset) provides soft, warm lighting that adds mood and depth to photos.
- Artificial Light: LED panels or tungsten lights with barn doors give you control over the direction and intensity of light. Use these to create dramatic contrasts and shadows.
- Rim Lighting: Positioning a light source behind the subject creates a halo or outline, adding dimension.
Experiment with lighting angles; side lighting or backlighting can create stunning shadows, depth, and mystery in your shots.
4. Composing Cinematic Shots
Composition plays a massive role in cinematic photography. You can create tension, harmony, or intrigue depending on how you arrange elements in the frame.
- Rule of Thirds: Positioning your subject off-center creates balance and space for the viewer’s eye to explore.
- Leading Lines: Roads, fences, or shadows leading towards the subject add a sense of journey or direction.
- Negative Space: Allowing blank or less detailed areas around the subject emphasizes isolation or tension.
Consider experimenting with unconventional angles; low or high viewpoints can make a scene feel more intense or emotionally charged.
5. Creating Depth and Dimension
A cinematic image has depth, making the viewer feel they could step right into it.
- Foreground, Midground, Background: Use layers to create depth. For instance, position an object like a branch or a doorway in the foreground, the subject in the midground, and a landscape in the background.
- Bokeh Effect: A shallow depth of field, where only the subject is in focus, creates a sense of depth and brings attention directly to the focal point.
By consciously adding layers to your photos, you transform them from flat images to immersive scenes.
6. Color Grading for a Cinematic Look
Color grading can be the difference between a good photo and a cinematic one. Use it to enhance mood and narrative.
- Teal and Orange: This popular scheme contrasts warm tones with cooler backgrounds, making subjects stand out.
- Desaturated Colors: Muted colors can create a more somber, dramatic mood.
- Vintage Hues: Adding subtle warm tints, like yellow or brown, can give a nostalgic or retro vibe.
Use software like Lightroom or Photoshop to control individual color tones. A light teal in the shadows and warm highlights can give your images that Hollywood feel.
7. Using Motion and Blur to Your Advantage
Movement and blur can give photos a sense of action and energy. Done right, they can make a still image feel alive.
- Motion Blur: Use a slower shutter speed to capture a moving subject, like a car or pedestrian, while keeping the background sharp.
- Freeze Motion: Conversely, a fast shutter speed can freeze a subject mid-movement, adding drama and tension.
- Panning: Move your camera along with a moving subject to keep them in focus while blurring the background, adding a sense of speed.
These techniques are particularly effective for street photography or capturing action scenes.
8. Adding Texture and Atmosphere
A cinematic photo feels textured and layered, with an atmosphere that draws viewers in.
- Fog and Mist: Shooting in foggy or misty conditions naturally adds depth and a sense of mystery.
- Rain or Snow: Bad weather can be great for atmosphere. Water droplets or snowflakes can bring an image to life.
- Smoke or Haze: If you can safely add smoke (like a fog machine) to an indoor scene, it creates a hazy effect that adds drama.
Textures make images tactile. They transform an image from merely visual to something that stirs other senses.
9. Telling a Story with Every Shot
Cinematic photography is about more than just a look; it’s about storytelling. Each shot should feel like it has a past, present, and future.
- Emotive Expressions: Capture your subjects with facial expressions or body language that tell a story.
- Implying Action: Show a subject in the middle of an action, like walking away or looking back. It adds narrative intrigue.
- Props and Setting: Use objects, outfits, or backgrounds to convey context. A character with an umbrella in a rainy alley, for instance, tells a more specific story than a subject on a sunny street.
The goal is to make viewers ask, “What happened before this?” or “What will happen next?”
10. Editing Techniques for the Finishing Touch
Editing is the final step in achieving a cinematic look. Subtlety is key; you want to enhance, not overpower.
- Exposure and Contrast: Adjust these to create a moody or high-contrast look.
- Split Toning: Add different color tones to highlights and shadows for a complex color profile.
- Vignetting: A slight vignette (darkening around the edges) focuses attention on the center and creates a frame within the frame.
Software like Lightroom, Photoshop, or dedicated apps can help you tweak colors, add grain, or refine the mood without going overboard.
Final Thoughts
Cinematic photography is about more than technical settings; it’s about creating a scene, evoking emotion, and telling a story in a single frame. Experiment with these techniques, and soon, you’ll be crafting photos that don’t just look beautiful—they’ll look like they belong on the big screen.
“Photography is the story I fail to put into words.” – Destin Sparks
Key Takeaways
- Mood and lighting set the tone for cinematic photos.
- Use composition and depth to create immersive scenes.
- Color grading and editing bring your vision to life.
FAQ
Q: Do I need a high-end camera for cinematic photography?
A: No, you can achieve cinematic effects even with smartphones by focusing on lighting, composition, and editing.
Q: What’s the best time of day for cinematic shots?
A: Golden hour (just after sunrise or before sunset) offers ideal lighting for cinematic photography.
Q: How do I choose a color scheme?
A: Teal and orange are popular for their contrast, but experiment with muted tones or warm and cool contrasts to suit your subject and mood.
Q: Should I always shoot in RAW?
A: Yes, shooting in RAW gives you more flexibility in post-processing, which is essential for cinematic photography.


