Some things just don’t want to be photographed. Whether it’s unpredictable nature, tricky lighting, or the frustrating limitations of camera settings, certain subjects test a photographer’s patience like no other. If you’ve ever found yourself cursing at your camera, chances are you’ve been up against one of these photography nightmares.
In this article, we’ll break down 10 of the hardest things to photograph and give you both semi-pro and pro tips to help you finally get the shot you’ve been chasing.
1. Fireworks – The Ultimate Timing Test
Fireworks are mesmerizing but notoriously difficult to capture. They move quickly, change brightness mid-explosion, and often occur in near-total darkness, making exposure settings a nightmare. Many beginners try to shoot fireworks in auto mode, only to end up with overexposed bursts or blurry streaks. The biggest challenge is syncing your shutter press with the explosion at the right moment.
Because fireworks happen fast, using a long exposure is essential. However, too much exposure can create unwanted light trails and muddy colors. Using a tripod is non-negotiable, as even the slightest hand movement can ruin a perfectly timed shot. Finding a vantage point that isn’t obstructed by buildings or trees can also make or break your composition.
🔹 Semi-Pro Tip: Use a tripod and set your shutter speed to around 2-5 seconds, with an aperture of f/8 to f/16. Pre-focus your lens to infinity to avoid autofocus delays.
⭐ Pro Tip: Use a black card technique—keep the lens open on bulb mode and cover it with a black card, removing it only when a firework bursts. This allows you to capture multiple bursts in one exposure without overexposing the shot.
2. Lightning – A Game of Chance
Lightning is one of nature’s most dramatic spectacles, but it’s also one of the hardest things to photograph. It’s unpredictable, fast-moving, and difficult to expose correctly. If you rely on clicking the shutter at the right time, you’re almost guaranteed to miss the strike. Instead, long exposures or lightning trigger devices are essential tools for capturing the perfect bolt.
The biggest mistake photographers make is using automatic settings, which will either fail to expose the strike properly or react too slowly. Storm conditions also add another layer of difficulty—wind, rain, and humidity can interfere with your shot, and standing in an unsafe location can be outright dangerous.
🔹 Semi-Pro Tip: Set your shutter speed between 10-30 seconds, use a tripod, and trigger the shot remotely. Set your focus to manual at infinity to avoid hunting focus issues.
⭐ Pro Tip: Use a lightning trigger—a specialized device that detects the first flash of lightning and automatically triggers your camera. This increases your chances of capturing a full bolt with crisp detail.
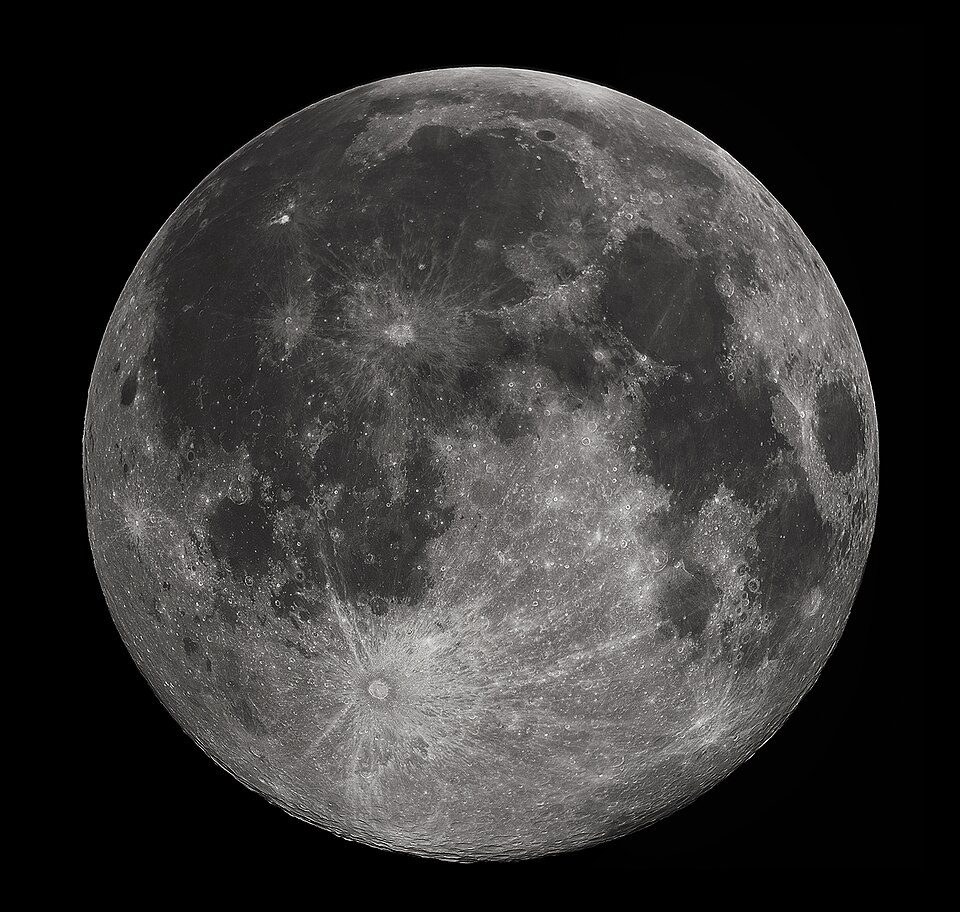
3. The Moon – Always Too Small or Overexposed
You see a massive, glowing moon in the sky, but when you take a photo, it looks like a tiny, overexposed dot. This is because cameras struggle with the brightness contrast between the moon and the night sky. If you expose for the darkness, the moon turns into a white blob; if you expose for the moon, everything else disappears into pure blackness.
The key is to treat the moon as a daylight subject since it’s illuminated by the sun. Many photographers mistakenly use high ISOs for nighttime shots, but in reality, a low ISO and fast shutter speed work best. If you want a detailed close-up, a telephoto lens (preferably 200mm or longer) is a must.
🔹 Semi-Pro Tip: Use manual settings—set ISO to 100, shutter speed to 1/250s or faster, and aperture between f/8 to f/11. Avoid using auto mode, as it tends to overexpose the moon.
⭐ Pro Tip: If you want both the moon and landscape exposed properly, take two separate shots (one exposed for the moon, one for the foreground) and blend them in post-processing. This technique, known as exposure stacking, creates a more balanced and dramatic image.
4. Snow – It Confuses Your Camera
A fresh snowfall can look magical, but photographing it is a headache. Cameras are programmed to expose for neutral gray, so they tend to underexpose snow, making it look dull and gray instead of crisp white. On top of that, bright snow can create harsh reflections that wash out details.
A common mistake is letting the camera’s auto white balance determine the color temperature. Snow often turns out with an unnatural blue or gray tint, making images look cold and lifeless. Adjusting the white balance and exposure compensation is crucial for getting the right tones.
🔹 Semi-Pro Tip: Use exposure compensation (+1 to +2 stops) to prevent your camera from underexposing the snow. Switch to daylight white balance to counteract blue tint issues.
⭐ Pro Tip: Use a circular polarizer filter to reduce glare and enhance contrast. This makes the snow appear more defined while bringing out rich blue skies in winter landscapes.
5. Glass and Reflections – A Photographer’s Worst Enemy
Shooting through glass or dealing with reflections is one of the most frustrating photography challenges. Whether it’s a storefront, a museum display, or a city skyline reflected on water, unwanted glare and reflections can ruin a shot. Even worse, you often accidentally capture your own reflection in the frame.
Most of the problem comes from light bouncing between surfaces. Using a polarizing filter can cut down reflections, but the shooting angle matters just as much. Avoid shooting straight-on at glass—position yourself at an angle to minimize reflections.
🔹 Semi-Pro Tip: Use a polarizing filter to reduce glare and increase clarity when shooting through glass or water surfaces.
⭐ Pro Tip: If shooting through glass, place your lens directly against the surface to block out reflections, or use a rubber lens hood to create a seal around the glass.
6. Water Droplets and Splashes – Blink and You’ll Miss It
Capturing water in motion—whether it’s a droplet mid-air or a dramatic splash—requires perfect timing and technical finesse. Water moves faster than the eye can follow, so you’ll need a high shutter speed to freeze it without blur. But that fast shutter also limits how much light hits the sensor, forcing you to compensate with lighting or ISO.
A common struggle here is getting the focus right. Autofocus often lags or misses the target completely, especially in macro shots. The result? A perfectly timed splash that’s just slightly out of focus. Artificial lighting is usually necessary, especially indoors or when shooting small-scale splashes like water hitting a surface or bouncing off a leaf.
🔹 Semi-Pro Tip: Shoot in shutter priority mode with speeds of 1/1000s or faster. Use burst mode and continuous autofocus to capture the droplet at just the right moment.
⭐ Pro Tip: Use an external flash set to a low power setting (1/16 or 1/32) to create ultra-short bursts of light that freeze motion even more effectively than the shutter itself. Combine that with a remote trigger and a macro lens for precision.
7. Neon Lights and Cityscapes at Night – A Balancing Act
Urban night scenes filled with neon lights have incredible visual potential, but photographing them is trickier than it seems. The lights are intensely bright, while the surrounding streets are often very dark. This creates a high-contrast scene that challenges a camera’s dynamic range. Overexposing the neon signs blows out the details, but underexposing loses all the street-level atmosphere.
Another hurdle is color accuracy—neon lights tend to have unusual hues that can look unnatural if your white balance is off. Long exposures help capture more ambient light, but they also make your camera susceptible to motion blur, especially if cars or people are moving in the frame.
🔹 Semi-Pro Tip: Use a tripod, set your ISO to 100–400, and use a shutter speed between 1–10 seconds with an aperture of f/8. Shoot in RAW to fix white balance issues in post.
⭐ Pro Tip: Shoot a bracketed exposure series (e.g., -2, 0, +2 EV) and blend them using HDR software or Photoshop. This retains detail in both shadows and highlights while controlling neon glow bleed.
8. Children and Animals – Unpredictable and Uncooperative
Trying to photograph kids or pets is like trying to catch lightning in a bottle—chaotic, adorable, and often frustrating. They move unpredictably, rarely look where you want them to, and have little patience for being still. You might frame the perfect shot, only to have them blink, yawn, or bolt just as you press the shutter.
The key here is to stay flexible and responsive. Anticipate movement rather than trying to force stillness. Candid shots almost always work better than posed ones. Shooting at their eye level and using natural light can also make a huge difference in the mood and quality of the photo.
🔹 Semi-Pro Tip: Use continuous autofocus (AI Servo/AF-C) and burst mode to increase your chances of capturing the right expression. Stick to 1/500s or faster shutter speed to freeze motion.
⭐ Pro Tip: Pre-focus on a zone where you expect the subject to move and shoot with a wide aperture (f/2.8–f/4) to create beautiful background blur while locking sharp focus on the eyes. Combine with back-button focus to track subjects more efficiently.
9. Aurora Borealis (Northern Lights) – A Test of Skill and Luck
Photographing the Northern Lights is a dream for many, but it’s not as easy as pointing your camera at the sky. The aurora appears in varying intensities, shifts constantly, and often only lasts for minutes at a time. It’s a race against nature and your camera settings. Plus, you need to be somewhere remote and cold with minimal light pollution—often in sub-zero temperatures.
The challenge lies in capturing movement without turning it into a blurry smear. Since you’re shooting at night, you have to balance long exposures with ISO noise, and focus is difficult due to the lack of contrast. Your camera settings need to be dialed in before the lights appear.
🔹 Semi-Pro Tip: Use a wide-angle lens, aperture of f/2.8 or wider, shutter speed between 5–15 seconds, and ISO between 800–3200. Focus manually to infinity before shooting.
⭐ Pro Tip: Adjust your shutter speed dynamically based on how fast the aurora is moving. For dancing, fast-moving auroras, stick to shorter exposures (under 5s) to preserve shape and texture. Combine shots into a time-lapse for a next-level presentation.
10. Fast-Moving Sports or Birds in Flight – Autofocus Struggles
Capturing fast action—whether it’s a basketball dunk or a hawk mid-swoop—requires technical precision and lightning-quick reflexes. Autofocus often can’t keep up, especially with erratic movement. Shutter speed is crucial, but the faster it is, the more light you’ll need to compensate, making lighting or ISO a constant juggling act.
Framing is another major issue. The tighter your zoom, the harder it is to keep the subject in the frame. For sports, you have to predict plays and position yourself well in advance. For birds, you’ll need both patience and insane tracking skills to follow their unpredictable flight paths.
🔹 Semi-Pro Tip: Use AI Servo/AF-C autofocus mode with zone focusing, a shutter speed of 1/2000s or faster, and shoot in burst mode. Don’t be afraid to crank the ISO—it’s better to get a noisy shot than a blurry one.
⭐ Pro Tip: Use back-button focus to separate focusing from the shutter release. Combine this with custom tracking sensitivity settings in your camera menu (most DSLRs and mirrorless systems offer this) to lock onto subjects even through cluttered backgrounds.
Final Thoughts
These subjects don’t just test your gear—they test your patience, adaptability, and creativity. Whether it’s the raw unpredictability of lightning or the subtle nuance of snow in the light, every challenge is an opportunity to grow as a photographer. Mastering even one of these tricky subjects can take your work to a whole new level.
Which of these have driven you nuts? And which one are you determined to master next?